
Welcome to DBA Master – Database Tips, Tricks, and Tutorials

Welcome to DBA Master ! This blog is dedicated to all things related to database administration , SQL optimization , and performance tuning . Whether you're a beginner or a seasoned DBA, you'll find practical guides, troubleshooting tips, and real-world tutorials to help you work smarter with data. What to Expect: SQL performance tuning tips Indexing strategies Backup and recovery best practices High availability and replication techniques Database creation, configuration, and setup Monitoring queries and scripts for proactive performance management Migration guides across different database platforms Security essentials and best practices Recommended tools for DBAs Real-world error fixes and how to solve them Stay tuned — exciting content is coming soon. Feel free to bookmark and share: www.dbamaster.com ! Thanks for visiting!

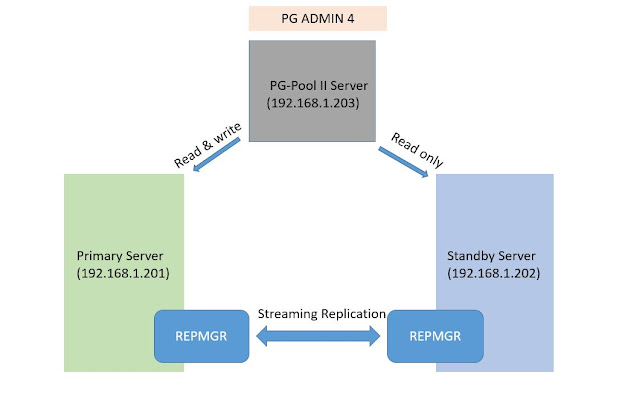
Repmgr Installation, Configuration and Commands

step 1:  normal physical streaming replication for two servers and add postgresql.conf "wal_log_hints = on"
        master data path =/var/lib/pgsql/10/data    port=5432
        slave data path = /var/lib/pgsql/10/tada    port=5433

step 2: install repmgr (yum install repmgr10-conrib)

        repmgr bin dir=/usr/pgsql-10/bin/ -->   repmgr and repmgrd
        repmgr configuration dir=/etc/repmgr/10/repmgr.conf

    both postgresql.conf changes parameter for shared_preload_library='repmgr'  //restart both server

step 3: copy repmgr.conf file

        cp -rf repmgr.conf repmgr_data.conf        // repmgr_data.conf is a current master repmgr configuration file
        cp -rf repmgr.conf repmgr_tada.conf        // repmgr_tada.conf is a current slave repmgr configuration file

step 4: edit master repmgr configuration file

        vi repmgr_data.conf
             node-id=1
             node_name = 'data'
             conninfo = 'host=current_host_IP user=postgres dbname=postgres port=5432'
             data_directory=/usr/local/pgsql/10/data/
             pg_bindir=/usr/pgsql-10/bin/
             use_replication_slots = yes
             monitoring_history=yes
             failover=automatic
             promote_command='/usr/pgsql-10/bin/repmgr standby promote -f /etc/repmgr/10/repmgr_data.conf'
             follow_command='/usr/pgsql-10/bin/repmgr standby follow -f /etc/repmgr/10/repmgr_data.conf -W --upstream-node-id=%n'

step 5: edit slave repmgr configuration file

        vi repmgr_tada.conf
             node-id=2
             node_name = 'tada'
             conninfo = 'host=current_host_IP user=postgres dbname=postgres port=5433'
             data_directory=/usr/local/pgsql/10/tada/
             pg_bindir=/usr/pgsql-10/bin/
             use_replication_slots = yes
             monitoring_history=yes
             failover=automatic
             promote_command='/usr/pgsql-10/bin/repmgr standby promote -f /etc/repmgr/10/repmgr_tada.conf'
             follow_command='/usr/pgsql-10/bin/repmgr standby follow -f /etc/repmgr/10/repmgr_tada.conf -W --upstream-node-id=%n'

        change owner for both repmgr.conf file

step 6: add nodes in repmgr

        su - postgres
        . .bash_profile            //run .bash_profile

repmgr -f /etc/repmgr/10/repmgr_data.conf primary register
        repmgr -f /etc/repmgr/10/repmgr_tada.conf standby register -F
       
        repmgr -f /etc/repmgr/10/repmgr_tada.conf standby follow

        ============================================================================================================================
 repmgr -f /etc/repmgr/10/repmgr_data.conf cluster show

            ID | Name | Role    | Status    | Upstream | Location | Priority | Timeline | Connection string                                        
            ----+------+---------+-----------+----------+----------+----------+----------+------------------------------------------------------------
            1  | data | primary | * running |          | default  | 100      | 3        | host=192.168.1.162 user=postgres port=5432 dbname=postgres
            2  | tada | standby |   running | data     | default  | 100      | 3        | host=192.168.1.162 user=postgres port=5433 dbname=postgres

repmgr -f /etc/repmgr/10/repmgr_tada.conf cluster show
            ID | Name | Role    | Status    | Upstream | Location | Priority | Timeline | Connection string                                        
            ----+------+---------+-----------+----------+----------+----------+----------+------------------------------------------------------------
            1  | data | primary | * running |          | default  | 100      | 3        | host=192.168.1.162 user=postgres port=5432 dbname=postgres
            2  | tada | standby |   running | data     | default  | 100      | 3        | host=192.168.1.162 user=postgres port=5433 dbname=postgres

step 7: monitoring for slave node repmgr

repmgrd -f /etc/repmgr/10/repmgr_tada.conf --monitoring-history --verbose
                [2019-12-19 13:18:49] [NOTICE] using provided configuration file "/etc/repmgr/10/repmgr_data.conf"
                [2019-12-19 13:18:49] [NOTICE] repmgrd (repmgrd 5.0.0) starting up
                [2019-12-19 13:18:49] [INFO] connecting to database "host=192.168.1.162 user=postgres port=5432 dbname=postgres"
                -bash-4.1$ INFO:  set_repmgrd_pid(): provided pidfile is /tmp/repmgrd.pid
                [2019-12-19 13:18:49] [NOTICE] starting monitoring of node "data" (ID: 1)
                [2019-12-19 13:18:49] [INFO] "connection_check_type" set to "ping"
                [2019-12-19 13:18:49] [NOTICE] monitoring cluster primary "data" (ID: 1)
                [2019-12-19 13:18:49] [INFO] child node "tada" (ID: 2) is attached

step 8: stop current master

            pg_ctl -D /var/lib/pgsql/10/data/ stop

        watch monitoring for slave node repmgr

 repmgrd -f /etc/repmgr/10/repmgr_data.conf --monitoring-history --verbose


                PROMOTE SUCESSFULLY

step 9: node rejoin for old master

        start old master -->    pg_ctl -D /var/lib/pgsql/10/data/ start

repmgr -f /etc/repmgr/10/repmgr_data.conf node service --action=stop --checkpoint

-------------------->(check port number for /var/lib/pgsql/10/data/)<------------------------

 repmgr -f /etc/repmgr/10/repmgr_data.conf node rejoin -d 'host=192.168.1.162 user=postgres port=5433 dbname=postgres' --force-rewind

failover complete.

Comments

Popular posts from this blog

Oracle Database 19C Performance Tunning - PART 1

Advantages: 1. Improved Query Performance •    Optimized SQL execution plans lead to faster query response times. •    Reduces unnecessary full table scans and improves indexing strategies. •    Parallel execution tuning speeds up large data processing tasks. 2. Better Resource Utilization •    Efficient use of CPU, memory, disk I/O, and network resources. •    Reduces contention on Redo Logs, Undo Tablespaces, and Buffer Cache. •    Helps in load balancing across multiple instances in RAC (Real Application Clusters). 3. Increased System Scalability •    Ensures that the database can handle a growing number of users and transactions. •    Proper tuning allows scaling without degrading performance. •    Optimized parallel processing ensures better performance on multi-core servers. 4. Lower Infrastructure Costs •    Reduces the need for add...

Oracle RMAN Backup And Restore

RMAN: (Oracle 8) RMAN (Recovery Manager) is a utility provided by Oracle Database to perform backup, restore, and recovery operations. It is a command line tool. Features of RMAN in Oracle 19c Comprehensive Backup Capabilities: Full and incremental backups. Block-level backups for efficient data storage. Archived redo log backups. Fast Recovery Area (FRA) integration for centralized backup storage. Efficient Recovery Options: Point-in-time recovery (PITR). Complete and incomplete recovery. Flashback database capabilities for quick undo of changes. Multitenant Database Support: RMAN fully supports container databases (CDBs) and pluggable databases (PDBs). Provides flexibility to back up and recover individual PDBs or entire CDBs. Automatic Space Management: Manages disk space in the FRA. Automatically deletes obsolete backups and archived logs. Data Deduplication and Compression: Backup optimization through block-level deduplication. Built-in compression algorithms to reduce storage req...

Oracle 19c Database Software Installation in OEL8

 Pre-requisites for OS level:            Set the static IP Address     Disable the Firewall (systemctl stop firewalld & systemctl disable firewalld)     set SELINUX=permissive on /etc/selinux/config  ##Need to restart the server use init 6 Oracle Installation Pre-requisites Methods     Automatic Setup     Manual Setup      Automatic requisites Setup: (avoid step 1 to step 5): dnf install -y oracle-database-preinstall-19c Install the dependencies: curl -o oracle-database-preinstall-19c-1.0-2.el8.x86_64.rpm https://yum.oracle.com/repo/OracleLinux/OL8/appstream/x86_64/getPackage/oracle-database-preinstall-19c-1.0-2.el8.x86_64.rpm dnf -y localinstall oracle-database-preinstall-19c-1.0-2.el8.x86_64.rpm Manual Setup: step 1: Add the karenl parameters and values vi /etc/sysctl.conf     fs.file-max = 6815744 kernel.sem = 250 32000 100 128 kernel....