
Pg_pool-II Installation and Configuration
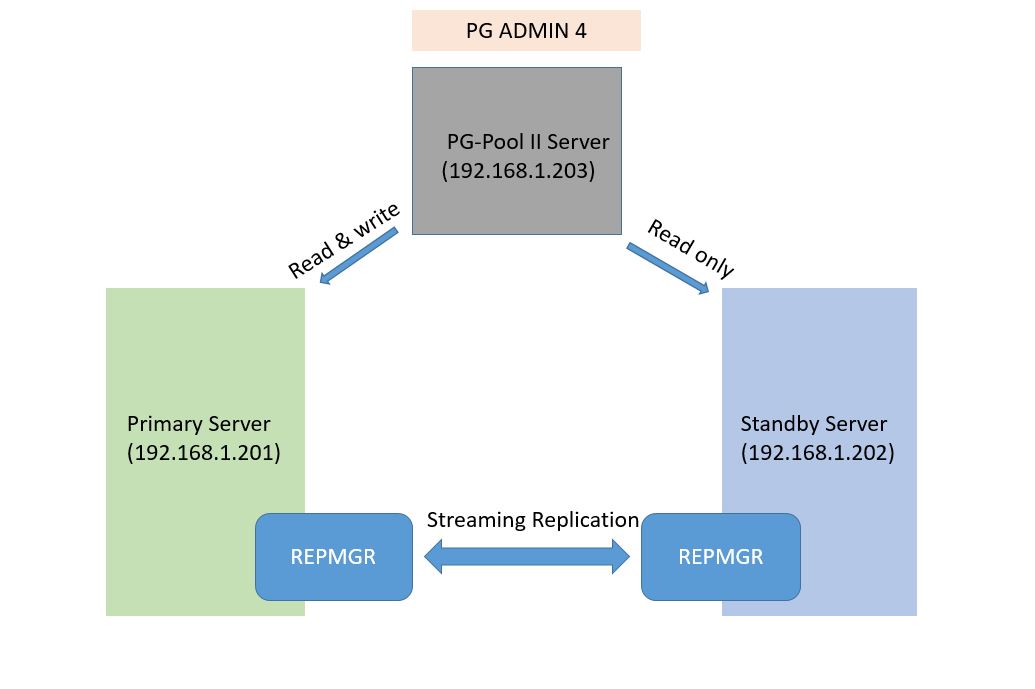
Pgpool-II is a proxy software that sits between PostgreSQL servers and a PostgreSQL database client.
It provides the following features:
1.Connection Pooling:
Pgpool-II maintains established connections to the PostgreSQL servers, and reuses them whenever a new connection with the same properties (i.e. user name, database, protocol version, and other connection parameters if any) comes in. It reduces the connection overhead, and improves system's overall throughput.
2.Load Balancing:
If a database is replicated (because running in either replication mode or master/slave mode), performing a SELECT query on any server will return the same result. Pgpool-II takes advantage of the replication feature in order to reduce the load on each PostgreSQL server.
It does that by distributing SELECT queries among available servers, improving the system's overall throughput. In an ideal scenario, read performance could improve proportionally to the number of PostgreSQL servers. Load balancing works best in a scenario where there are a lot of users executing many read-only queries at the same time.
3.Replication:
Pgpool-II can manage multiple PostgreSQL servers. Using the replication function enables creating a realtime backup on 2 or more physical disks, so that the service can continue without stopping servers in case of a disk failure.
4.Limiting Exceeding Connections:
There is a limit on the maximum number of concurrent connections with PostgreSQL, and connections are rejected after this many connections.
5.Watchdog:
Watchdog can coordinate multiple Pgpool-II, create a robust cluster system and avoid the single point of failure or split brain. Watchdog can perform lifecheck against other pgpool-II nodes, to detect a fault of Pgpoll-II. If active Pgpool-II goes down, standby Pgpool-II can be promoted to active, and take over Virtual IP.
Prerequisite:
- Allready streaming Replication for mater and slave
- Allready Configuration for Repmgr
How to Install Pgpool-II?
yum install pgpool-II-11.x86_64
Bin Path:
/usr/bin/pgpool
Configuration Path:
/etc/pgpool-II-11
Configuration Files:
hba-file:
pool_hba.conf.sample to change pool_hba.conf
config-file:
pgpool.conf.sample-replication to change pgpool.conf
pcp-file:
pcp.conf.sample to change pcp.conf
key-file:
.pgpoolkey //create file and chown postgres and chmod 600
Edit hba-file:
vi pool_hba.conf
================
# TYPE DATABASE USER CIDR-ADDRESS METHOD
# "local" is for Unix domain socket connections only
local all all trust
# IPv4 local connections:
host all all 192.168.1.201/32 trust
host all all 192.168.1.202/32 trust
host all all 192.168.1.203/32 trust
host all all 192.168.1.3/32 trust
host all all 127.0.0.1/32 trust
host all all ::1/128 trust
=============================================================
Edit config-file:
vi pgpool.conf
==============
listen_addresses = '*'
port = 9999
pcp_listen_addresses = '*'
pcp_port = 9898
backend_hostname0 = '192.168.1.201'
backend_port0 = 5432
backend_weight0 = 1
backend_data_directory0 = '/var/lib/pgsql/11/data'
backend_flag0 = 'ALLOW_TO_FAILOVER'
backend_hostname1 = '192.168.1.202'
backend_port1 = 5432
backend_weight1 = 1
backend_data_directory1 = '/var/lib/pgsql/11/data'
backend_flag1 = 'ALLOW_TO_FAILOVER'
enable_pool_hba = on
log_connections = on
log_hostname = on
log_statement = on
log_per_node_statement = on
pid_file_name = '/var/run/pgpool-II-11/pgpool.pid'
logdir = '/tmp'
replication_mode = on
load_balance_mode = on
master_slave_mode = on
master_slave_sub_mode = 'stream'
sr_check_period = 1
sr_check_user = 'postgres'
sr_check_password = 'post'
sr_check_database = 'postgres'
health_check_period = 1
health_check_timeout = 20
health_check_user = 'postgres'
health_check_password = 'post'
health_check_database = 'postgres'
=====================================================================
Edit pcp-file:
vi pcp.conf
===========
postgres:42b90196b487c54069097a68fe98ab6f //encrypt password
==========================================
how to encrypt password:
[root@server3 pgpool-II-11]# pg_md5 -u postgres -p
password:
42b90196b487c54069097a68fe98ab6f
Edit key-file:
vi .pgpoolkey
192.168.1.201:5432:postgres:post
192.168.1.202:5432:postgres:post
Run Pgpool-II Tool:
[root@server3 ~]# pgpool -n -D -d
2020-08-02 18:31:02: pid 12518: DEBUG: initializing pool configuration
2020-08-02 18:31:02: pid 12518: DETAIL: num_backends: 2 total_weight: 2.000000
2020-08-02 18:31:02: pid 12518: DEBUG: initializing pool configuration
[root@server3 tools]# pcp_attach_node -U postgres -h 192.168.1.203 -n 0
Password:
pcp_attach_node -- Command Successful
[root@server3 tools]# pcp_attach_node -U postgres -h 192.168.1.203 -n 1
Password:
pcp_attach_node -- Command Successful
[root@server3 tools]# pcp_node_count -U postgres
Password:
2
Comments
Post a Comment